Hardness testing

Vickers (HV), Brinell (HBS, HBW), Rockwell (HRC), Leeb (Equotip), UCI, Shore A and D hardness testing equipment is available.

Vickers tests in the measuring ranges HV 0.1 ... 20 are computer-controlled: positioning, indentation, image acquisition and evaluation of the hardness impressions.

The following can be determined Case hardening depth CHD (DIN EN ISO 2639), hardening depth DS (DIN EN 10328) and nitriding depth Nht (DIN 50190-3).

Application example «Hardness curve»

The wear and load capacity of a gearwheel are highly dependent on the local strength of the material. For many metallic materials, the strength can be specifically changed, e.g. by suitable heat treatment. Hardness (resistance to plastic deformation when impressed by a harder test specimen) is an easily accessible measurand for assessing the local strength of a material.

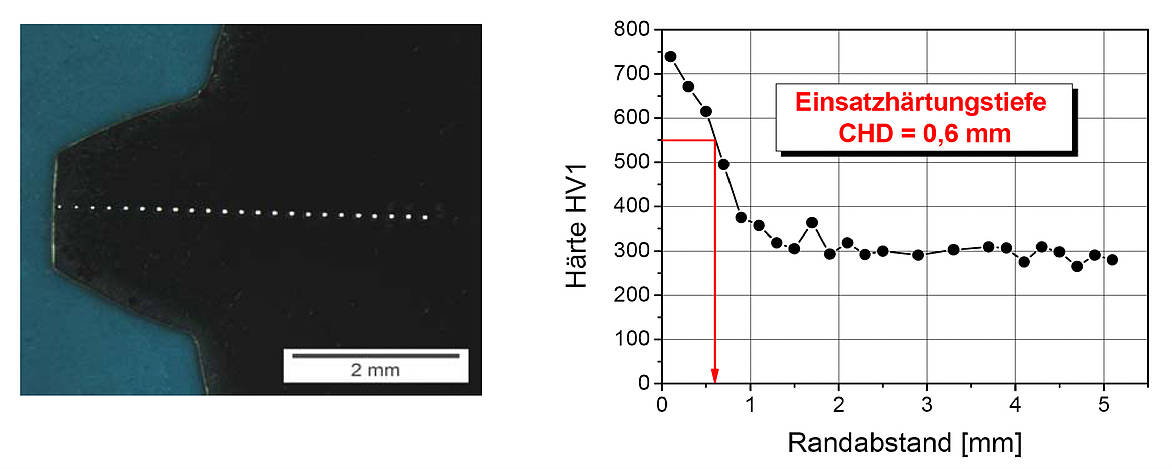
The determination of the hardness curve perpendicular to the surface of a gear shown above served to control the hardening process. It was determined here whether the hardness specified in the design at the component surface as well as the «case hardening depth CHD» (old name: Eht) were adhered to. The case hardening depth is a measure of the depth below the surface to which a minimum hardness (here: 550 HV) is exceeded.

Rene Pfister

IMP Institut für Mikrotechnik und Photonik Wissenschaftlicher Mitarbeiter Materials Engineering

+41 58 257 31 20 rene.pfister@ost.ch